• Local vLLM and llama.cpp Dashboard

    Local vLLM and llama.cpp  Dashboard

    Introduction

    Over the last several months I have been doing a bit of experimentation locally hosted LLMs, primarily with vLLM, llama.cpp, different quantization methods, GPU configurations, and models. My overall goal is a smart enough local agent that can code and troubleshoot, and ask smarter frontier models for help/review.

    Part of this journey has been learning about all the tuning knobs. As knowing the api is responding is not really enough.

    I also want to know things like:

    • What model is actually loaded?
    • How much VRAM is it consuming?
    • How much VRAM do I still have available?
    • Is the GPU actually doing anything?
    • What context size am I running?
    • How much KV cache is being consumed?
    • What parameters did I start the inference engine with?
    • How fast is the model actually responding?

    Most of this information is available somewhere, but I wanted to not have to hunt and peck for data.

    Normally, I would check Docker, query an API endpoint, run amd-smi (or nvidia-smi), look through vLLM startup logs, inspect environment variables, and then run another script just to benchmark the model. Not hard, but requires a few steps or maybe a script.

    Instead, I built a dashboard.

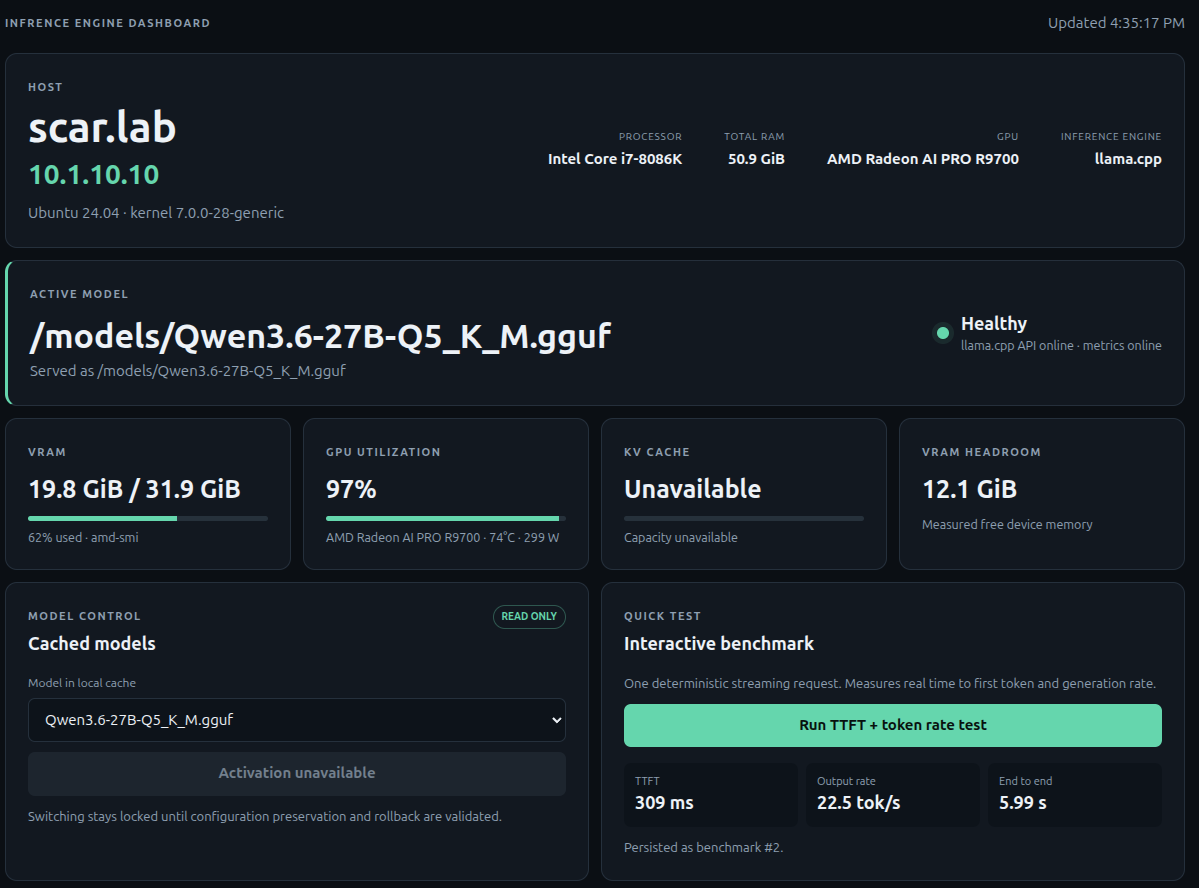
    The project is called the Inference Engine Dashboard, and the goal is pretty simple: give me one place to see what my local inference server is doing.

    This is not a proxy, or a chat engine. There are already plenty of those.

    This is an operations and monitoring dashboard for vLLM and llama.cpp.


    What I Wanted From the Dashboard

    My primary use case is a workstation running a local LLM while I am also using the machine normally.

    That makes VRAM particularly important, as I need to keep enough VRAM available if I want to fire up the desktop (DE).

    For example, I may intentionally configure vLLM to use less than the maximum available GPU memory because I still need enough VRAM left for my desktop, browser, IDE, and other applications.

    In that environment, I want to be able to open a webpage and immediately see something like:

    • GPU: AMD Radeon AI PRO R9700
    • VRAM used: 23 GB / 32 GB
    • Inference process: 21 GB
    • Other GPU applications: 2 GB
    • Remaining headroom: 9 GB
    • Model: Qwen
    • Context: 32K
    • KV cache utilization
    • GPU utilization
    • GPU temperature
    • Current token throughput

    Basically, the things I normally end up checking manually.


    Local-First Architecture

    I deliberately designed the dashboard to run on the same physical machine as the inference engine as some information is easy to get remotely from the vLLM or llama.cpp API, but detailed hardware and process information is not.

    To accurately determine what is happening on the host, the dashboard may need access to:

    • GPU devices
    • GPU process information
    • Docker container metadata
    • Inference process IDs
    • ROCm libraries
    • Model cache directories
    • Host CPU and memory information

    The application itself runs using Docker Compose.

    docker compose ps

    I also did not want to simply give the application unrestricted access to /var/run/docker.sock, so Docker access is provided through a restricted Docker socket proxy.

    Model caches and other host resources are mounted read-only wherever possible.

    That was an important design decision because eventually I may allow the dashboard to manage inference engines, but I don’t want to jump directly from “monitoring dashboard” to “application that can arbitrarily manipulate containers.”


    Current Dashboard Information

    The main dashboard provides a quick overview of the host and inference environment.

    It includes information such as:

    Host

    • Hostname
    • IP address
    • Operating system
    • Kernel
    • CPU
    • Total system memory

    GPU

    • GPU model
    • GPU utilization
    • Temperature
    • Power consumption
    • VRAM used
    • VRAM available
    • Inference-process VRAM
    • Other GPU process usage

    Inference Engine

    • Active model
    • Backend
    • API health
    • Metrics health
    • Maximum context
    • KV-cache utilization
    • Current throughput
    • Runtime configuration

    The dashboard also displays locally cached models so I can see what is already available on the host.

    If the inference engine or GPU tooling doesn’t expose a particular value, the dashboard displays it as unavailable rather than trying to estimate it.


    Monitoring vLLM

    vLLM exposes quite a bit of useful information, but it isn’t all available from one location.

    The dashboard therefore combines information from several sources, including:

    /health
    /v1/models
    /metrics

    along with:

    • Docker inspection
    • Container environment variables
    • vLLM startup logs
    • GPU process telemetry

    From those sources the dashboard can display information including:

    • Active model
    • Served model name
    • vLLM version
    • Container image
    • Maximum model length
    • GPU memory utilization target
    • Precision
    • Quantization
    • Maximum sequences
    • Maximum batched tokens
    • Prefix caching
    • KV-cache type
    • KV-cache allocation
    • KV-cache utilization
    • KV-cache token capacity
    • CPU offload
    • Swap configuration
    • Maximum concurrency
    • Prompt throughput
    • Output throughput
    • Model-weight VRAM
    • Inference-process VRAM
    • Other GPU VRAM usage
    • Remaining VRAM headroom

    Some of the more detailed memory information is only available in the vLLM startup logs.

    This is another reason the dashboard runs locally.

    If vLLM doesn’t provide enough information to reliably calculate a value, the dashboard simply reports it as unavailable.


    Monitoring llama.cpp

    One of the more interesting parts of the project was adding llama.cpp support as llama.cpp and vLLM expose very different information.

    My first thought was to simply use the same dashboard fields and populate whatever llama.cpp could provide.

    That quickly resulted in a screen containing a whole bunch of:

    N/A
    N/A
    N/A
    N/A

    which isn’t particularly useful.

    So the dashboard now uses provider-specific runtime views.

    For llama.cpp it queries endpoints including:

    /health
    /v1/models
    /props
    /metrics
    /v1/completions

    Depending on what the server exposes, the llama.cpp runtime panel can display:

    • Active GGUF model
    • Configured context window
    • Native model context window
    • GGUF quantization
    • Model parameter count
    • Model file size
    • Parallel slots
    • GPU layers
    • Batch size
    • Microbatch size
    • Temperature
    • Top-K
    • Top-P
    • Min-P
    • Repeat penalty
    • llama.cpp build version
    • Container image
    • Token throughput
    • Inference-process GPU memory

    This makes the llama.cpp view much more useful than trying to force llama.cpp into a vLLM-shaped dashboard.


    GGUF Model Discovery

    The dashboard can also scan a configured directory containing GGUF models.

    For example:

    /models

    or wherever your llama.cpp model library happens to live.

    The directory is mounted read-only into the dashboard container and any discovered GGUF files are displayed in the model selector.

    At the moment this is informational.

    The dashboard can see the models, but it cannot switch to them yet.

    That is intentional.


    AMD GPU Monitoring

    My current workstation uses an AMD GPU, so ROCm support was a requirement from the beginning.

    On AMD systems the dashboard primarily uses:

    amd-smi

    with ROCm SMI available as a fallback.

    In addition to total GPU memory consumption, I wanted to know who was using the VRAM.

    That allows the dashboard to distinguish between:

    Inference Process
    Other GPU Processes
    Unattributed GPU Memory
    Free VRAM

    This is particularly useful on a workstation.

    If my inference engine is configured to consume around 23 GB of a 32 GB GPU, I want to know whether the remaining GPU memory is actually available or whether Chrome, my desktop environment, an IDE, or something else has already consumed part of it.


    The Interactive Benchmark

    I also wanted a quick way to test a model after changing its configuration. Wasn’t looking for a massive benchmark suite.

    Just something that answers:

    Does this model actually feel fast when I interact with it?

    The dashboard includes a:

    Run TTFT + token rate test button.

    The benchmark sends a deterministic streaming request through the OpenAI-compatible endpoint.

    /v1/completions

    The current test uses:

    Temperature: 0
    Seed: 1
    Maximum output: 128 tokens
    Concurrency: 1
    Warm-up requests: 0

    The test records three values that I care about for interactive use.

    Time to First Token

    How long did I wait before the model actually started responding?

    Output Tokens Per Second

    Once generation started, how quickly did the model generate tokens?

    End-to-End Latency

    How long did the complete request take?

    The benchmark results are stored in SQLite along with information including:

    • Model
    • Prompt tokens
    • Completion tokens
    • Seed
    • Time to first token
    • Generation time
    • End-to-end latency
    • Output tokens/sec
    • Raw streaming evidence

    That means I can start building some history as I experiment with different models and runtime settings.


    What This Benchmark Is Not

    The built-in benchmark is intended as a quick interactive performance test.It is not intended to replace a proper inference benchmarking suite.

    Currently it does not test:

    • Multiple simultaneous users
    • P50/P95/P99 latency
    • Long-context performance
    • Sustained GPU utilization
    • Warm versus cold requests
    • Maximum batch throughput
    • Extended resource sampling

    Those are all things I may eventually add.

    For now I mainly want to answer:

    I changed something. Did the model get faster or slower?

    For that, the test works pretty well.


    Deployment

    Deployment is intentionally simple.

    Clone the repository, configure the environment, and run:

    ./scripts/deploy.sh

    Host-specific settings are stored in a gitignored:

    .env

    file.

    The same dashboard can be configured for either inference engine by setting:

    INFERENCE_BACKEND=vllm

    or:

    INFERENCE_BACKEND=llama_cpp

    and providing the appropriate API endpoint and model-cache location.

    The containers use Docker’s:

    unless-stopped

    restart policy, so the dashboard will come back automatically after the host reboots and Docker starts.


    Why Model Switching Is Disabled

    You may notice that the dashboard can discover models but currently doesn’t allow you to activate one.

    This is intentional.

    It would actually be fairly easy to add a button that stops an inference container and starts another model.

    The problem is everything that can happen after I push that button.

    For example:

    1. Stop the running inference engine.
    2. Start the new model.
    3. Model doesn’t fit in VRAM.
    4. Container crashes.
    5. API never becomes healthy.
    6. Previous configuration is now gone.
    7. My inference server is offline.

    Not particularly useful.

    Before enabling model switching I want the application to support something closer to a transaction:

    Save current configuration
    Stop current model
    Start requested model
    Validate container
    Validate API
    Validate model
    SUCCESS

    If something fails:

    FAIL
    Restore previous configuration
    Restart previous model
    Validate health

    Once that logic exists, enabling lifecycle controls makes much more sense.


    Security

    Authentication is also not implemented yet.

    So at this point the dashboard should only be exposed on a trusted network.

    That is less concerning while the application is primarily read-only, but it becomes much more important once lifecycle controls are introduced.

    Before enabling model switching or container management I plan to add authentication and additional authorization controls.


    Why I Built It

    This really came out of repeatedly doing the same troubleshooting process.

    I would SSH into the workstation and run something like:

    docker ps

    Then:

    amd-smi

    Then:

    curl http://localhost:8000/v1/models

    Then:

    curl http://localhost:8000/metrics

    Then look through the container logs:

    docker logs <container>

    Then maybe run another script to see how fast the model was responding.

    None of those things are particularly difficult.

    It is just a lot of little pieces of information spread across several different tools.

    Now I can open one page and immediately see:

    • What model is running
    • Whether the inference server is healthy
    • How much VRAM it is consuming
    • What else is using the GPU
    • How much VRAM I have left
    • What context size is configured
    • How much KV cache is being used
    • How the inference engine was configured
    • How quickly the model starts responding
    • How many tokens/sec it is generating

    Which is basically what I wanted.


    What’s Next

    There are several things I would eventually like to add.

    The big one is obviously safe model switching.

    Beyond that I would like to explore:

    • Model configuration profiles
    • Transactional model switching
    • Automatic rollback
    • Authentication
    • Historical GPU metrics
    • Historical VRAM consumption
    • Benchmark history and comparison charts
    • Longer-context benchmarks
    • Concurrent request testing
    • NVIDIA GPU support
    • Additional inference engines

    There is also an interesting possibility of having the dashboard recommend runtime settings based on available GPU memory and the selected model.

    But I don’t want this to become another giant AI management platform.

    The original goal is still the most important one:

    Open one page and understand what my local inference server is doing.

    So far, it has made experimenting with vLLM and llama.cpp considerably easier.

    Resources

    1. Project Repository
      https://github.com/christopherpaquin/vLLM-Llama.ccp-Dashboard
    2. vLLM
      https://github.com/vllm-project/vllm
    3. llama.cpp
      https://github.com/ggml-org/llama.cpp
  • The AMD R9700 – Ubuntu 24.04 Quickstart Guide

    The AMD R9700 – Ubuntu 24.04 Quickstart Guide

    ….and I bought an AMD GPU.

    It’s the first time I’ve gone non-Nvidia since before 2010 as I’ve been a Nvidia loyalist since the GeForce 256 back in 1999 (was 3dfx prior). But Nvidia GPU pricing on anything with decent VRAM has gotten absurd, even on the used market. I kept hearing that ROCm (Radeon Open Compute) support for inference has finally matured. So I decided to find out for myself.

    I picked up the AMD Radeon AI PRO R9700, 32GB. Not cheap, but brand new its cheaper than an RTX 3090 24gb from 2020.

    Since this is my first AMD in very long while, going to have to figure out drivers. So let’s get started. First lets gather some info by running the commands below.

    lspci -nn | grep -Ei 'VGA|Display|AMD|ATI'
    lsmod | grep amdgpu
    dmesg | grep -i amdgpu | tail -50

    Verify GPU Detection

    Prior to card swap, purged my Ubuntu 24.04 system of all Nvidia drivers and tools.

    Lets check to see if the card is detected properly

    lspci -nn | grep -Ei 'VGA|Display|AMD|ATI'

    This command searches the PCI device list for anything matching VGA, Display, AMD, or ATI. In the output below we see the following

    • 03:00.0 is the PCI id of the R9700 GPU
    • Vendor ID 1002 confirms AMD Device
    • 7551 is how the kernel identifies this GPU generation/device
    • The two PCI bridge entries show the GPU exposes an internal PCIe switch/bridge topology
    01:00.0 PCI bridge: AMD Navi 10 XL Upstream Port of PCI Express Switch
    02:00.0 PCI bridge: AMD Navi 10 XL Downstream Port of PCI Express Switch
    03:00.0 VGA compatible controller: AMD Device [1002:7551]
    03:00.1 Audio device: AMD Device [1002:ab40]

    The important takeaway is that Ubuntu already recognizes the R9700 correctly and the in-kernel AMDGPU driver is successfully initializing it.

    lsmod | grep amdgpu

    This command above shows whether the AMDGPU kernel module is loaded and what other kernel modules depend on it.

    amdgpu 21188608 26

    This tells us:

    • amdgpu is loaded
    • the module occupies roughly 21 MB of kernel module memory
    • 26 references/users currently depend on it
    dmesg | grep -i amdgpu | tail -50

    The command above shows the last 50 kernel messages associated with AMDGPU initialization.

    The most important things we see are:

    MEM ECC is active.

    The GPU’s VRAM ECC capability is active.

    VRAM: 32624M

    The kernel detects approximately 32 GB of VRAM.

    Detected VRAM RAM=32624M, BAR=32768M

    Preparing for ROCm Install

    First lets make sure that the kernel has created the ROCm compute device

     ls -l /dev/kfd
    crw-rw---- 1 root render 235, 0 Aug  9 16:20 /dev/kfd


    /dev/kfd is the Kernel Fusion Driver device that ROCm/HIP uses to submit compute workloads to the AMD GPU. AMD’s ROCm installation process relies on access through the render/video device groups.

    In the output above, you can see that the Kernel Fusion Driver is owned by root with group membership of render. We need to add my user to the render group. Note that I had to reboot to pick up the changes.

    sudo usermod -aG render cpaquin

    Now we can add the ROCm 7.2.2 package repo, which is two steps. This one below…

    sudo mkdir --parents --mode=0755 /etc/apt/keyrings
    wget https://repo.radeon.com/rocm/rocm.gpg.key -O - | \
    gpg --dearmor | sudo tee /etc/apt/keyrings/rocm.gpg > /dev/null

    And this next one to actually add the repo.

    sudo tee /etc/apt/sources.list.d/rocm.list <<'EOF'
    deb [arch=amd64 signed-by=/etc/apt/keyrings/rocm.gpg] https://repo.radeon.com/rocm/apt/7.2.2 noble main
    deb [arch=amd64 signed-by=/etc/apt/keyrings/rocm.gpg] https://repo.radeon.com/graphics/7.2.1/ubuntu noble main
    EOF

    Now let’s be smart and ensure that the repo was added properly.

    cat /etc/apt/sources.list.d/rocm.list
    deb [arch=amd64 signed-by=/etc/apt/keyrings/rocm.gpg] https://repo.radeon.com/rocm/apt/7.2.2 noble main
    deb [arch=amd64 signed-by=/etc/apt/keyrings/rocm.gpg] https://repo.radeon.com/graphics/7.2.1/ubuntu noble main

    Now before we install anything, per AMD recommendation, we need to pin the above repo priority. Pinning means settings which repository Ubuntu prefers when the same package is available from multiple repositories, which means prefer the AMD repos over Ubuntu repos for AMD bits and bobbles.

    sudo tee /etc/apt/preferences.d/rocm-pin-600 <<'EOF'
    Package: *
    Pin: release o=repo.radeon.com
    Pin-Priority: 600
    EOF

    Now we update metadata.

    sudo apt update

    We can see the repo preference via pinning below.

     apt policy rocm
    rocm:
      Installed: (none)
      Candidate: 7.2.2.70202-86~24.04
      Version table:
         7.2.2.70202-86~24.04 600
            600 https://repo.radeon.com/rocm/apt/7.2.2 noble/main amd64 Packages


    ROCm Install

    First, lets make sure we have the following installed.

    sudo apt install python3-setuptools python3-wheel

    Now we can install ROCm. It takes a bit so be patient, or don’t.

    sudo apt install rocm

    Now lets verify that ROCm can see the GPU

    rocminfo

    Truncated output below

    rocminfo
    ROCk module is loaded
    =====================
    HSA System Attributes
    =====================
    Runtime Version: 1.18
    Runtime Ext Version: 1.15
    System Timestamp Freq.: 1000.000000MHz
    Sig. Max Wait Duration: 18446744073709551615 (0xFFFFFFFFFFFFFFFF) (timestamp count)
    Machine Model: LARGE
    System Endianness: LITTLE
    Mwaitx: DISABLED
    XNACK enabled: NO
    DMAbuf Support: YES
    VMM Support: YES
    *******
    Agent 2
    *******
    Name: gfx1201
    Uuid: GPU-407fcdae2bc6b11d
    Marketing Name: AMD Radeon AI PRO R9700
    Vendor Name: AMD
    Feature: KERNEL_DISPATCH
    Profile: BASE_PROFILE
    Float Round Mode: NEAR
    Max Queue Number: 128(0x80)
    Queue Min Size: 64(0x40)
    Queue Max Size: 131072(0x20000)
    Queue Type: MULTI
    Node: 1
    Device Type: GPU

    And now run amd-smi.

    amd-smi
    +------------------------------------------------------------------------------+
    | AMD-SMI 26.2.2+671d39a71e amdgpu version: 7.0.0-28 ROCm version: 7.2.2 |
    | VBIOS version: 00158746 |
    | Platform: Linux Baremetal |
    |-------------------------------------+----------------------------------------|
    | BDF GPU-Name | Mem-Uti Temp UEC Power-Usage |
    | GPU HIP-ID OAM-ID Partition-Mode | GFX-Uti Fan Mem-Usage |
    |=====================================+========================================|
    | 0000:03:00.0 ...Radeon AI PRO R9700 | 1 % 31 °C 0 9/300 W |
    | 0 0 N/A N/A | 3 % 20.0 % 661/32624 MB |
    +-------------------------------------+----------------------------------------+
    +------------------------------------------------------------------------------+
    | Processes: |
    | GPU PID Process Name GTT_MEM VRAM_MEM MEM_USAGE CU % |
    |==============================================================================|
    | No running processes found |

    What we are looking at:

    • ROCm 7.2.2 is active.
    • The Radeon AI PRO R9700 is correctly identified.
    • Temperature is 31 °C.
    • Power draw is only 9 W / 300 W at idle.
    • Fan is at 20%.
    • VRAM usage is 661 MB / 32,624 MB, which is normal for the display/driver stack.
    • No uncorrectable ECC errors: UEC 0.
    • No compute processes are currently using the GPU.

    Test ROCm inside Docker

    Can a Docker container access the R9700 through ROCm? Lets find out.

    docker run --rm \
    --device=/dev/kfd \
    --device=/dev/dri \
    --group-add 992 \
    --group-add 44 \
    rocm/rocm-terminal:latest \
    rocminfo

    What this does:

    • starts a temporary AMD ROCm container
    • passes /dev/kfd into it for ROCm compute
    • passes /dev/dri into it for the GPU device nodes
    • gives the container the needed video (44) and render (992) group access
    • runs rocminfo inside the container
    • deletes the container afterward because of --rm

    If it works, we should see the same R9700 identification inside Docker that we saw on the host, including something like:


    Pytorch Test

    Next we’ll use AMD’s validated PyTorch container for ROCm 7.2 / Ubuntu 24.04 / Python 3.12 / PyTorch 2.9.1. AMD recommends Docker for PyTorch because the image already contains a tested PyTorch+ROCm combination.

    docker run --rm \
    --device=/dev/kfd \
    --device=/dev/dri \
    --group-add 992 \
    --group-add 44 \
    --security-opt seccomp=unconfined \
    --ipc=host \
    --shm-size 8G \
    rocm/pytorch:rocm7.2_ubuntu24.04_py3.12_pytorch_release_2.9.1 \
    python3 -c "import torch; print('PyTorch:', torch.__version__); print('ROCm:', torch.version.hip); print('GPU available:', torch.cuda.is_available()); print('GPU:', torch.cuda.get_device_name(0) if torch.cuda.is_available() else 'NONE')"

    This will likely download a fairly large container image the first time.

    What we want to see is essentially:

    PyTorch: 2.9.1+rocm7.2.0.git7e1940d4
    ROCm: 7.2.26015-fc0010cf6a
    GPU available: True
    GPU: AMD Radeon AI PRO R9700

    One potentially confusing point: PyTorch keeps the API name torch.cuda even when using AMD ROCm.

    torch.cuda.is_available() returning True means PyTorch has a usable GPU backend; on this container that backend is HIP/ROCm, not NVIDIA CUDA. AMD uses this same test in its ROCm PyTorch verification instructions.

    So the R9700 is now validated for actual ROCm/PyTorch compute inside Docker. Next Step VLLM and test some models.

  • Fixing the OpenSSH Post-Quantum Warning on RHEL 9

    Fixing the OpenSSH Post-Quantum Warning on RHEL 9

    Fired up my RHEL9 server today, something that I have not done in a while due to the savage summer heat in the southern US. All my Dell servers have had the summer off for this reason.

    Upon login via ssh I saw a warning message, which I do not think I have seen before on this machine – all my other Dell servers are RHEL 10, and this one was built with RHEL 9 due to deprecated support for older processors in RHEL 10. Specifically the Intel Xeon E5-2697 (Ivy Bridge) v2.

    Anyway, below is the warning message.

    ** WARNING: connection is not using a post-quantum key exchange algorithm.
    ** This session may be vulnerable to "store now, decrypt later" attacks.
    ** The server may need to be upgraded. See https://openssh.com/pq.html

    This warning means that the SSH client supports post-quantum key exchange, but the RHEL 9 SSH server did not offer one. It does not indicate that the current connection is broken; it warns about possible future decryption of captured traffic.

    Hence the “store now, decrypt later message above.


    SNDL/HNDL

    “Store Now, Decrypt Later” (also called Harvest Now, Decrypt Later) is when an attacker intercepts encrypted traffic, not with the idea of decrypting it now, but rather once they have access to a more powerful quantum computer running advanced algorithms. Today’s standard SSH connections rely on classical asymmetric cryptography (like Elliptic Curve Diffie-Hellman) which quantum computers can theoretically break.

    Meaning, you may not be vulnerable now, but you could be later.

    Most newer OpenSSH clients warn when a connection does not negotiate a post-quantum key-exchange algorithm because long-lived or sensitive data captured today could remain valuable in the future.

    Honestly this is not a big concern in my lab, but the warning will drive me up a wall.


    The RHEL 9 Fix

    The good news is that RHEL 9.1 and later support the following hybrid post-quantum SSH key-exchange method. So we can remediate.

    sntrup761x25519-sha512@openssh.com

    This combines the post-quantum sntrup761 algorithm with the traditional X25519 elliptic-curve key exchange. Because it is hybrid, the connection remains protected as long as either component remains secure.

    Red Hat added support for this algorithm to the RHEL 9 system-wide cryptographic-policy framework, but it must be explicitly enabled through a custom subpolicy.


    Confirm the RHEL Version

    First, lets confirm that the server is running RHEL 9.1 or later:

    cat /etc/redhat-release

    You can also check the installed OpenSSH and crypto-policy package versions:

    rpm -q openssh-server crypto-policies

    Update OpenSSH and the Crypto-Policy Packages

    sudo dnf update openssh-server crypto-policies

    This ensures that the server has the RHEL packages that include support for the SNTRUP hybrid key-exchange algorithm.

    In my case, this step initially revealed a separate Red Hat subscription problem:

    Status code: 403 for https://cdn.redhat.com/...

    A 403 from the Red Hat CDN generally means that the server can reach the repository, but the system is not currently authorized to download its content. This may be caused by an expired developer subscription, stale registration data, an invalid entitlement, or a system identity left over from an earlier installation.

    Useful commands for checking the registration state include:

    sudo subscription-manager identity
    sudo subscription-manager status
    sudo subscription-manager repos --list-enabled

    As I said this machine has been powered off for a while, so lets refresh registration and repository metadata.

    sudo subscription-manager refresh
    sudo dnf clean all
    sudo rm -rf /var/cache/dnf
    sudo dnf makecache

    In my case, the system registration is stale, so I need to unregister and re-register.

    sudo subscription-manager unregister
    sudo subscription-manager clean
    sudo subscription-manager register

    After registration, we ensure that the standard RHEL 9 repositories are enabled:

    sudo subscription-manager repos \
    --enable=rhel-9-for-x86_64-baseos-rpms \
    --enable=rhel-9-for-x86_64-appstream-rpms

    Then rebuild the DNF cache:

    sudo dnf clean all
    sudo rm -rf /var/cache/dnf
    sudo dnf makecache

    Create a Custom Crypto-Policy Module

    Next we create a new policy module named SNTRUP:

    sudo tee /etc/crypto-policies/policies/modules/SNTRUP.pmod >/dev/null <<'EOF'
    key_exchange = +SNTRUP
    EOF

    The module name must use uppercase characters because crypto-policy module filenames are conventionally uppercase and end with .pmod.

    The policy adds the SNTRUP algorithm to the key-exchange methods permitted by the existing system-wide policy.


    Apply the Policy

    Apply the custom module on top of the normal RHEL DEFAULT policy:

    sudo update-crypto-policies --set DEFAULT:SNTRUP

    Confirm that the new policy is active:

    update-crypto-policies --show

    You are looking for expected output as shown below.

    DEFAULT:SNTRUP

    RHEL uses system-wide cryptographic policies to configure applications including OpenSSH, TLS libraries, IPsec, DNSSEC, and Kerberos. Using a crypto-policy module is therefore preferable to manually changing generated OpenSSH backend files.


    Restart SSH

    Next we restart sshd so that it reads the updated cryptographic policy:

    sudo systemctl restart sshd

    And we confirm that the service restarted without issue

    sudo systemctl status sshd --no-pager

    Verify the Server Configuration

    Run the command below to check the current SSH server key-exchange configuration:

    sudo sshd -T | grep -i '^kexalgorithms'

    The output should include:

    sntrup761x25519-sha512@openssh.com

    We can also inspect the generated OpenSSH server crypto-policy backend:

    grep -i kexalgorithms \
    /etc/crypto-policies/back-ends/opensshserver.config

    Files beneath /etc/crypto-policies/back-ends/ are generated by the crypto-policy framework and should not normally be edited directly. Manual changes may be overwritten the next time the system policy is updated.

    Now it’s time to test.

    7. Test a New SSH Connection

    Open a new terminal window, leaving the existing window open just in case we broke something. In the second window, connect with verbose logging:

    ssh -vv user@server

    Look for a line similar to:

    debug1: kex: algorithm: sntrup761x25519-sha512@openssh.com

    The original post-quantum warning should no longer appear.

    A more focused test can be performed by explicitly requesting the algorithm:

    ssh \
    -o KexAlgorithms=sntrup761x25519-sha512@openssh.com \
    user@server

    If this succeeds, both the SSH client and server support the hybrid key exchange.

    We can check whether the local SSH client recognizes the algorithm with:

    ssh -Q kex | grep -i sntrup

    Expected output:

    sntrup761x25519-sha512@openssh.com

    Depending on the client version, another SNTRUP variant may also be listed.


    Troubleshooting

    If the algorithm does not appear in the output from sshd -T, first confirm that the custom policy is active:

    update-crypto-policies --show

    Then confirm that the policy module contains the correct entry:

    cat /etc/crypto-policies/policies/modules/SNTRUP.pmod

    It should contain:

    key_exchange = +SNTRUP

    Reapply the policy and restart SSH:

    sudo update-crypto-policies --set DEFAULT:SNTRUP
    sudo systemctl restart sshd

    Check the SSH service logs for errors:

    sudo journalctl -u sshd -b --no-pager

    You can also validate the SSH configuration before restarting the service:

    sudo sshd -t

    No output means that the configuration passed validation.


    Important FIPS Consideration

    Do not replace an existing FIPS policy with DEFAULT:SNTRUP on a system required to operate in FIPS mode.

    Check the current policy first:

    update-crypto-policies --show

    Also check whether the kernel is operating in FIPS mode:

    cat /proc/sys/crypto/fips_enabled

    A value of 1 means that FIPS mode is active.

    Algorithms permitted by the normal RHEL DEFAULT policy are not automatically permitted under the RHEL FIPS policy. Red Hat documents that certain Curve25519-based SSH key exchanges are not allowed in FIPS mode, so the SNTRUP hybrid method should not be enabled without validating the applicable compliance requirements.


    Rolling Back the Change

    To remove the SNTRUP subpolicy and return to the standard RHEL default policy:

    sudo update-crypto-policies --set DEFAULT
    sudo systemctl restart sshd

    Confirm the result:

    update-crypto-policies --show

    Expected output:

    DEFAULT

    The custom policy file can then be removed if it is no longer needed:

    sudo rm -f /etc/crypto-policies/policies/modules/SNTRUP.pmod

    Final Result

    After enabling the RHEL crypto-policy module, restarting sshd, and creating a new connection, the server and client should negotiate:

    sntrup761x25519-sha512@openssh.com

    The SSH session still uses familiar symmetric encryption and authentication mechanisms. The portion being changed is the initial key exchange used to establish the session keys.

    This does not make the entire SSH protocol “post-quantum.” It adds a hybrid post-quantum key-exchange mechanism designed to protect the session-establishment process against both traditional attacks and the future possibility of cryptographically capable quantum computers.

    This server that has a few years of useful service (specifically for my Infiniband testing), but cannot move to RHEL 10. So enabling the supported RHEL 9 hybrid key exchange is “good enough”.

  • The July 2026 Agentic Coding Cheat Sheet: Frontier Tools, Cost Models, and Quota Mechanics – V2

    The July 2026 Agentic Coding Cheat Sheet: Frontier Tools, Cost Models, and Quota Mechanics – V2

    The tool sprawl in AI engineering has officially outrun our collective memory, at least it has mine.

    Between native terminal agents, newly minted desktop clients, and entirely divergent API cost models, keeping the ecosystem straight is a full-time job.

    I built this reference guide for a very simple reason: I needed a single, no-nonsense source of truth to track what tools each frontier provider actually offers right now, and exactly how running autonomous developer loops will affect my wallet.

    Here is the state of the stack as I know it and use it. Sure there are plenty of options I am missing.


    The Tooling Matrix: Interfaces, CLIs, and IDEs

    This matrix maps out exactly where each provider expects you to interact with their models, highlighting the shift toward dedicated desktop environments and autonomous terminal agents.

    Provider / EcosystemFlagship Web / Workspace InterfaceOfficial Desktop AppNative CLI / Terminal AgentIDE Integration Strategy
    GitHub CopilotGitHub.com & Copilot Workspace (Issue-to-PR sandbox)GitHub Copilot App (Native agent-centric control center)GitHub Copilot CLI (TUI via gh copilot with local execution capabilities)Official Extension (VS Code, JetBrains, Visual Studio, Neovim)
    Anthropic (Claude)Claude.ai (with Artifacts for rendering code/UI side-by-side)Claude Desktop App (Supports local filesystem/tool execution)Claude Code (State-of-the-art terminal agent for codebase refactoring)No official extension; relies on CLI or third-party tools like Cline/Continue
    OpenAI (ChatGPT)ChatGPT (utilizes Canvas for inline text and code editing)ChatGPT Desktop App (Mac & Windows)OpenAI API CLI (Primarily for asset, file, and model management)No direct IDE tool; serves as the model layer for Cursor, Aider, etc.
    Google (Gemini)Gemini Web InterfaceAntigravity 2.0 Desktop ClientAntigravity CLI (Replaces old gemini-cli; orchestrates parallel agent tasks)Gemini Code Assist & Antigravity plugins (VS Code, Android Studio, IntelliJ)
    DeepSeekDeepSeek Chat (V3 & R1 reasoning models)Mobile Apps (Relies on web wrappers for desktop)None natively (Relies on community tools like Ollama or Aider)Native integration into open-source extensions like Continue and Cline
    PerplexityPerplexity.ai (Pro search & “Pages” workspace)Perplexity Desktop (Mac & Windows)None (Relies on API keys for third-party scripts)None (Primarily used as a data-grounding search API)

    The Economic Matrix: Quotas, Costs, and Loop Behavior

    This is the most critical matrix, IMHO. As someone who is experimenting with numerous paid frontier model services, each with a limited budge, I am not all in on any service yet, and want to maximize my low-paid token tiers.

    This table explains how the subscription models and APIs.

    Provider / ServiceDeveloper Plan & Cost (USD)IDE / CLI Billing MechanismQuota / Rate Limit MechanicsThe “Agentic Loop” Behavior (The Cost Trap)
    GitHub CopilotPro: $10/mo
    Max: $100/mo
    Flat-rate subscription for native tools.Hybrid Metered: Unlimited standard completions + a fixed pool of premium model credits.The Safest Route: Because it’s integrated, Microsoft absorbs a massive amount of the token cost, but heavy loop usage will hit a speed throttle unless on the Max tier.
    Anthropic (Claude)Pro: $20/mo
    Max 5x: $100/mo
    Billed via web account or separate Pay-As-You-Go API.5-Hour Rolling Window: Dynamic usage budget that resets every 5 hours based on server demand.High Risk for Pro: Running Claude Code on a large infrastructure repository will hit your 5-hour limit fast. Full-time agentic workflows require switching to Claude Max or the raw API.
    OpenAI (ChatGPT)API Account
    (Pay-As-You-Go)
    BYOK (Bring Your Own Key): Paid per token used in Cursor, Aider, etc.Volumetric Tiers: Limits depend on lifetime account funding (Tiers 1–5), scaling from 200k to millions of tokens/min.Predictable but Costly: Perfect for episodic troubleshooting, but an out-of-control recursive autonomous loop can easily rack up a $20–$50 bill in an afternoon.
    Google (Gemini)Code Assist Standard
    ~$19/mo
    Flat-rate per user or metered hourly via Google Cloud.Concurrently Throttled: Throttles users if background parallel multi-agent loops request too much compute at once.Great for Standard Dev: Highly stable for individual coding, but hard to hook into un-vetted, third-party autonomous command-line tools.
    DeepSeekPlatform API
    (Pay-As-You-Go)
    BYOK: Funded via a pre-paid developer wallet.Wallet Funded: Strictly bound by whatever dollar amount you load into your account.The Economy Champion: Because of their unified architecture and heavy 90%+ prompt caching discounts, running heavy agentic loops costs literal pennies compared to western models. $10 can last a month.
    PerplexityPerplexity Pro
    $20/mo
    Subscription includes a small monthly API credit.Fixed Credit Ceiling: API access stops or charges your card when your small monthly search token allowance runs dry.Not For Coding Loops: Great for pulling real-time documentation or API schemas into your agent, but financially unviable for writing or refactoring code blocks.

    Understanding the Layers of Agentic LLM Tool Execution

    To expand this post, it is useful to define several concepts that are now common in agentic AI systems: tools, skills, MCP servers, local execution layers, and IDE-integrated actions.

    Out of the box, an LLM is primarily a reasoning and text-generation system. You can ask it questions, request explanations, have it draft a script, or ask it to review configuration, and it will respond with generated text. By itself, however, the model does not inherently have access to your operating system, local files, terminal, IDE, logs, repositories, ticketing systems, monitoring platforms, or infrastructure.

    That distinction is important.

    A hosted model may appear to have additional capabilities, such as reading uploaded documents, searching the web, generating files, or analyzing code, but those capabilities are usually provided by the surrounding platform, client application, or agent runtime rather than by the model alone.

    This is where concepts such as tools, skills, MCP servers, and agent runtimes become important. These components extend an LLM from a passive chatbot into an interactive agentic system. The model can reason about what needs to happen, request the appropriate tool, inspect the result, and continue working through a task. The runtime around the model is responsible for exposing those tools, enforcing policy, executing approved actions, and returning results back to the model.

    When discussing LLMs that can inspect logs, modify files, run scripts, query systems, or interact with development environments, it is important to separate the layers involved. These capabilities are often described broadly as “agentic AI,” but agentic behavior is usually the result of several distinct components working together.

    The model provides reasoning and structured tool-call requests. The orchestration layer manages the workflow, state, prompts, and tool-calling loop. The local execution layer performs approved actions against the operating system, filesystem, terminal, repository, or other target environment. IDE-integrated actions expose workspace-specific capabilities such as file editing, diagnostics, Git state, and terminal access. Skills provide reusable task-specific instructions or workflows. MCP servers provide a standardized way to expose tools, resources, and prompts to compatible AI clients.

    In other words, the LLM is tool-aware, but the surrounding runtime is tool-authoritative.

    The model may decide that it needs to read a log file, edit a configuration file, run a script, or inspect a repository. However, the runtime determines which tools exist, which actions are allowed, where those actions execute, what policy controls apply, and what results are returned to the model.

    The table below provides a high-level comparison of the major concepts involved in LLM-driven local execution and tool integration.

    LLM Agent Execution Layers and Integration Concepts

    ConceptFormal NameWhat It MeansWhat It Controls or ProvidesExample in Practice
    Tool callingTool calling / function calling / structured tool invocationThe model’s ability to request an external action using a defined schema instead of free-form text.Provides the structured interface between the LLM and external capabilities.The model requests read_file(path="/var/log/app.log") or run_tests(command="pytest").
    ToolAgent tool / callable tool / local execution toolA specific function or action that can be invoked by the agent workflow.Provides a single capability, such as reading a file, tailing logs, running a script, or checking Git status.tail_log, write_file, run_shell, git_diff, restart_service.
    AgentLLM agent / tool-using agent / agentic workflowThe loop that allows the model to plan, call tools, observe results, and continue until the task is complete.Coordinates reasoning, tool requests, observations, and final responses.The agent reads an error log, edits a config file, restarts a service, checks the result, and reports back.
    Agent orchestration frameworkAgent framework / workflow orchestration frameworkA framework used to build and manage the agent loop, tools, prompts, state, and execution flow.Provides abstractions for models, prompts, tools, memory, state, routing, and workflow control.LangChain, LangGraph, Semantic Kernel, AutoGen, CrewAI.
    Local execution layerGoverned local execution layer / OS execution layer / tool execution runtimeThe runtime component that actually performs approved actions against the local operating system or workspace.Controls OS-level access, command execution, filesystem changes, script execution, and result capture.Running journalctl, editing a YAML file, executing a validation script, or applying a patch.
    IDE-local actionsIDE agent tools / workspace tools / editor-integrated actionsTool capabilities provided inside an IDE or local coding assistant environment.Gives the agent access to files, terminals, diagnostics, search, Git state, and editor context within a workspace.Cursor, Cline, Continue, Zed, VS Code Chat, Aider, OpenHands.
    SkillsAgent skills / repo-local skills / workflow skillsPackaged instructions, scripts, conventions, or workflows that teach an agent how to perform a specific task in a specific context.Provides repeatable task guidance and project-specific operating instructions.A repo skill that tells the agent how to validate changes using shellcheck, pytest, yamllint, and ./health-check.sh.
    MCPModel Context Protocol / MCP server / MCP tool / MCP resourceA standard protocol for exposing tools, resources, and prompts to compatible AI clients.Standardizes how external systems provide capabilities and context to AI applications.An MCP server exposes filesystem access, GitHub issues, database queries, lab inventory, or monitoring data.
    Policy and guardrailsExecution policy / tool governance / approval policyThe rules that determine what tools are available, what actions are allowed, and whether approval is required.Controls access boundaries, command restrictions, file path restrictions, approval gates, logging, and auditability.Allow reading logs but require approval before modifying /etc/ or restarting a service.
    Observability and audit trailAgent observability / execution logging / audit trailThe record of what the agent requested, what was approved, what was executed, and what changed.Provides troubleshooting, reviewability, compliance, and rollback support.Logging each tool call, command output, file diff, approval decision, and final result.
  • From Phrasing to Choreography: An Exceptionally Brief History of Agentic Coding

    From Phrasing to Choreography: An Exceptionally Brief History of Agentic Coding

    The future is now… which is now “then.”

    Do you remember where you were on November 30th, 2022. If you were in the US (or perhaps Liberia or parts of Mexico as I have recently come to learn), you may have been sitting around the house eating leftover turkey, or a nice ham sandwich (if you were fortunate to have both available on Thanksgiving).

    November 30th, 2022 was the launch date for ChatGPT.

    Although it was very rough around the edges and not ready for prime-time, many immediately saw into the future. I cannot say that I did immediately, but I was out there experimenting, watching it “lie” to me. Those “lies” were quickly labeled hallucinations and sounded much cooler. Anyway the race was on apparently. Not that I was fully paying attention at the time.

    Like most engineers across infrastructure, hardware, or software, I’ve spent the last four years just trying to keep my head above water. Figuring out what to learn and what to ignore has become almost as exhausting as the actual learning process. On one side, you have the performative hype from influencers desperate to prove how far ahead of the curve they are. On the other, there’s a deafening wall of noise from frontier model providers and newly christened startups, all frantically trying to dump a product before their razor-thin window of entrepreneurship slams shut.

    As a traditional infra-engineer, LLMs and agentic coding have been quick to deliver value. I have never identified as a software engineer, but rather a hardware and infra-centric practitioner. I’ve spent my work-life architecting, deploying, and supporting Unix/Linux, virtualization platforms, and enabling hardware functions such as SR-IOV for Telcos across North America.

    I’m the guy who knows the difference between raid 0+5 and 5+0.

    Suddenly, I am now a technologist who now has the tools to quickly deliver true infrastructure as code without having to become an evangelist for any specific automation platform. Suddenly, its much easier to deploy tools, supporting services, create dashboards, and troubleshoot and resolve system/hardware issues.

    Strangely I have always loved creating documentation, and have spent many years being frustrated with the lack of documentation that I have seen from others. To me, a measure of success is the fact that a solution that you built, is still relied upon once you are gone. Without proper documentation, and the ability for your successors to truly understand, operate, and enhance something that you built is dependent on great documentation. If you can not transfer the appropriate level of operational and design knowledge to those who replace you, they will replace your solution as well. With AI, everyone now has the power of documentation. “Review this repo and describe how it works, update the README.md”. It’s truly a wonderful thing.

    The Micro-Eras of Agentic Coding

    Having done my best to keep up via reading, experimenting, and building, I have learned quite a bit in a very short time. Those who share the same passions and beyond are often learning the same things at the same time. Separately, but also together, as they uniformly change the vernacular of agentic coding. First, we learn how to prompt from the perspective of a persona, defining outcomes. Next, we discover the need for guardrails and frameworks, especially when the word security rears its ugly head.

    Nothing below is unique or original, and I am not sure that there is actually a difference between 3 & 4, or possibly the Eras are in the wrong order, but here is my table for trying to keep straight concepts and terminologies that describe those contexts

    Era & FocusThe Primary Problem SolvedThe Technical Stumbling BlockThe AI Engineer’s Job
    1. Prompt Engineering
    (2022-2023)
    Expression: Shaping the tone, persona, and output formatting of the LLM.Hallucinations: Cannot conjure up data or facts it wasn’t trained on.Writing clear, contextual instructions and few-shot examples.
    2. Context Engineering
    (2023-2024)
    Information: Injecting real-time, proprietary data via RAG and Vector DBs.Passivity: The model can read your data, but cannot act on it or use tools.Managing token budgets, chunking data, and optimizing semantic retrieval.
    3. Harness Engineering
    (2024-2025)
    Environment: Giving the model tools, secure sandboxes, and safety guardrails.Rigidity: Linear chains break completely when the model makes a minor mistake.Building secure execution environments, MCP servers, and input/output parsers.
    4. Loop Engineering
    (2025-2026)
    Autonomy: Letting the system evaluate, self-correct, and iterate recursively.Compute Cost: High token consumption due to repetitive agent cycles.Designing state machines, testable termination conditions, and exit criteria.

    “It’s all vibecoding, right”

    The term “vibe-coding” was officially coined by Andrej Karpathy (former Director of AI at Tesla and co-founder of OpenAI) in a viral post on X (Twitter) on February 8, 2025.

    And it’s a term that I despise, despite fully understanding how fitting that term was at the time.

    Fast forward 1.5 years, and now “vibe-coding” sounds silly and very passe, as to me it implies sitting down with a chat window and an idea, and nothing more. This is what kids do in the basement to build a fun yet forgettable android game, right?

    And this is not where we are today. Today we are knee-deep in learning, and imagining what the next step is in this agentic evolution.

    Planning, context, guardrails, loops, governance, frameworks, and harnesses is where we are, at least mainly in theory, and sometimes in practice.

  • How to Reconfigure Claude Code CLI when changing subscriptions

    How to Reconfigure Claude Code CLI when changing subscriptions

    My employer recently put the kibosh on personal home lab usage.

    No longer can employees who have invested time and money into building out a lab to learn and test our own products utilize their home lab to connect to any internal tool or service. You can not even access your work gmail on anything other than your company provided workstation or your monitored phone.

    Which apparently means that I can no longer use my work provided Claude code account from a non-company supplied workstation, as its a company provided tool.

    This was my original workflow

    A flowchart illustrating a software development process with five steps: starting with a laptop labeled 'Claude/Cursor', followed by 'Test & Deploy in Home Lab', then 'Fix Bugs and Secure', next 'Commit', and finally 'Clone Repo to Work Env'.

    Now my choices are to either “Test & Deploy on Company Hardware” or utilize my own subscriptions and do my initial development on whatever workstation I happen to be in front of at the time. I chose the latter, as I want to establish my own agentic workflows that are not dependent on employer provided subscriptions, and I want to utilize my own hardware without having to deal with hardware resource scheduling.

    So that takes us to where we are today.

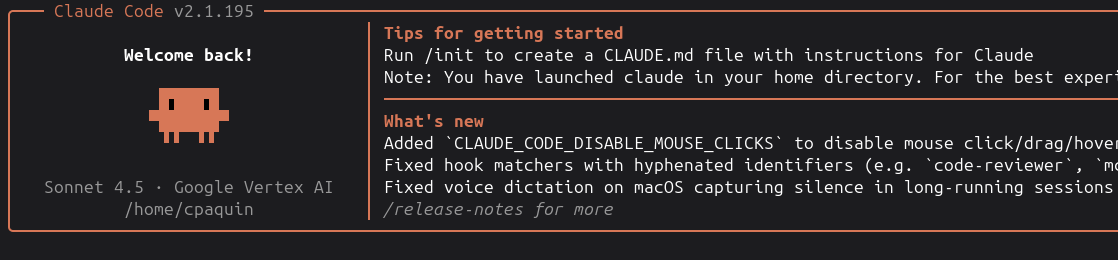
    A broken Claude Code CLI, that fails to authenticate as my initial corp provided config seems to be pervasive across multiple env vars and conf files. So lets clean that up.

    Screenshot of a terminal interface displaying welcome message for Claude Code v2.1.195, with tips for getting started and recent updates.

    First step is to remove any env vars you find in the files below

    grep -rE "CLAUDE_CODE_USE_VERTEX|ANTHROPIC_VERTEX_PROJECT_ID|CLOUD_ML_REGION|VERTEX|vertex" \
    ~/.bashrc \
    ~/.zshrc \
    ~/.bash_profile \
    ~/.profile \
    ~/.config/environment.d/* \
    /etc/environment \
    /etc/profile.d/* \
    ~/.claude/settings.json \
    ~/.claude/settings.local.json \
    2>/dev/null

    We must go deeper.

    find ~ -maxdepth 3 -name ".env" 2>/dev/null | xargs grep -l -iE "vertex|CLAUDE_CODE" 2>/dev/null

    Any vars found here, delete.

    Let’s make sure I cleaned up all shell vars. If you find any – unset them. Then source your .bashrc to make sure they are not set there on login.

    env | grep -iE "vertex|gcloud|google|claude|anthropic"
    PWD=/home/cpaquin/.claude

    Same with claude logging, we can check the latest debug log and look for errors around a broken config (use /debug to enable).

    cat ~/.claude/debug/latest

    Once you have removed any detritus from your config/env simply re-launch Claude and authenticate via your method of choice.

    Login screen for Claude Code with options for account types: Claude account with subscription, Anthropic Console account, and 3rd-party platform.

  • Project “NVIDIA HPC Infiniband Homelab GPU Cluster”: Part 3: RDMA Performance Testing

    Project “NVIDIA HPC Infiniband Homelab GPU Cluster”: Part 3: RDMA Performance Testing

    Before moving on to Part 3 of this project, lets review what we have accomplished thus far.

    In Part 1 and Part 2 we have…

    • Did a bit of planning and scoping
    • Built a 3-node GPU cluster (viper, columbia, prometheus)
    • Interconnected with InfiniBand Installed and validated ConnectX-4 NICs and RDMA stack (mlx5, ib_core, etc.)
    • Brought up the InfiniBand fabric using OpenSM (links active, LIDs assigned)
    • Verified topology and connectivity (ibstat, ibnetdiscover)
    • Configured IP over InfiniBand for basic networking between nodes Identified PCIe/NUMA limitations affecting optimal GPU↔NIC performance

    We are now ready to do some performance testing of our Infiniband network.


    Pre-Test Setup

    Before we can get started on our perf testing we have bit of work to do. We are going to install a few packages, and configure some tunables.

    Diagnostic Tools

    First lets make sure that we have a couple tools installed, so lets install some rpms.

    sudo dnf install infiniband-diags libibverbs-utils librdmacm-utils -y

    Kernel Modules

    InfiniBand and GPUDirect require specific modules to load at boot. So lets create hpc.conf in /etc/modules-load.d/. This creates (or overwrites) /etc/modules-load.d/hpc.conf. This file ensures each module loads automatically at boot via systemd-modules-load. Run this on each host.

    sudo tee /etc/modules-load.d/hpc.conf >/dev/null <<'EOF'
    ib_ipoib
    ib_umad
    ib_uverbs
    nvidia-peermem
    EOF

    Then force load the modules.

    sudo modprobe ib_ipoib ib_umad ib_uverbs nvidia-peermem

    Below is a short breakdown/description for each module.

    ModuleHow it’s used
    ib_ipoibProvides IP networking over InfiniBand (e.g., ib0) for SSH, NFS, TCP/IP
    ib_umadEnables userspace IB management tools (e.g., ibstat, fabric queries)
    ib_uverbsCore RDMA interface used by applications (MPI, NCCL, libibverbs)
    nvidia-peermemEnables GPUDirect RDMA for direct GPU ↔ NIC memory transfers (no CPU copy)

    Locked Memory Limits

    RDMA works by “pinning” memory so the OS cannot swap it to disk. So we need to create /etc/security/limits.d/99-hpc.conf as shown below.

    sudo tee /etc/security/limits.d/99-hpc.conf >/dev/null <<'EOF'
    * soft memlock unlimited
    * hard memlock unlimited
    EOF

    Performance & RDMA Benchmarking

    Health Check

    First lets run the following commands on any host under test, just to make sure the InfiniBand network is healthy before we start any testing. Run each line individually and make note of the output.

    hostname
    ibstat
    ibv_devinfo | egrep 'hca_id|transport|fw_ver|port:|link_layer|active_mtu|sm_lid|port_lid'

    You are specifically interesting in the following

    • Device Present (mlx5)
    • State: Active
    • Physical state: LinkUp
    • Link layer: InfiniBand

    Confirm HCA Name and Port Number

    Run on any device under test – we will need this for our test on our receiver and sender side.

    ibv_devices

    Output from columbia.lab.

     device          	   node GUID
     ------          	----------------
     mlx5_0          	248a070300ac5414


    Output from prometheus.lab

     device          	   node GUID
     ------          	----------------
     mlx5_0          	248a070300ac5610


    Run the RDMA Latency Test

    For our ib_send_lat (latency test) our device IP addresses are as follows.

    • columbia.lab – 172.16.50.12
    • prometheus.lab -172.16.50.11

    On our first device, columbia.lab, we run the following and leave it running.

    ib_send_lat -d mlx5_0 -i 1

    Now over on prometheus, run the command below. Insert the IP from columbia captured above. You will see a good bit of output in your terminal window.

    ib_send_lat -d mlx5_0 -i 1 <columbia_ip>

    Key configuration details

    So assuming the test did not fail, you are going to see some data spit out. Lets make sense of some of it.

    ParameterValueMeaning
    Devicemlx5_0ConnectX-4 (mlx5 driver)
    TransportIB (RC)Reliable Connection (standard RDMA mode)
    MTU4096Optimal for IB performance
    Queue Pairs1Single stream test
    Inline data236BSmall messages optimized
    Link typeInfiniBandCorrect mode

    What this test is actually doing

    ib_send_lat:

    • Registers memory with the NIC
    • Creates RDMA queue pairs
    • Sends messages using:
      • ibv_post_send()
    • Measures completion latency via completion queues (CQs)

    This is direct RDMA messaging, not IP networking.

    Our Overall results

    • Average latency: ~1.15 µs
    • Typical latency: ~1.14 µs
    • Minimum latency: 1.06 µs
    • Outliers: up to 11.41 µs
    • Conclusion: Healthy RDMA performance

    While InfiniBand ≠ RDMA test by default, our test ib_send_lat specifically uses RDMA verbs, so a successful result proves RDMA is working.

    In the output above, our average latency confirms that RDMA is functioning, as is kernel bypass. Note, that while we are using TCP/IP to setup the test, the actual data transfer is NIC to NIC and memory to memory. The queue pair exchange confirms RDMA session, as QPs were created on both nodes and transitioned through the required queue pair states shown below.

    StateNamePurposeAnalogy
    INITInitializeLocal QP setupPhone powered on
    RTRReady to ReceiveCan receive remote dataYou know the other person’s number
    RTSReady to SendFully operational (send + receive)Call connected and talking

    Run the RDMA Bandwidth Test

    For this test we will run ib_send_bw. This test measures the following.

    • Throughput (bandwidth) of RDMA send operations
    • NIC-to-NIC data transfer rate
    • Memory → NIC → fabric → NIC → memory

    Again this test uses IP to establish the initial connection between nodes, but make no mistake we are using RDMA verbs and are testing IB traffic (not IP traffic).

    So over on our first node (columbia.lab) we run the following.

    ib_send_bw -d mlx5_0 -i 1 -a

    Why these flags

    FlagPurpose
    -d mlx5_0Select your ConnectX-4 device
    -i 1Use IB port 1
    -aSweep all message sizes

    And on our second node we run the command shown below.

    ib_send_bw -d mlx5_0 -i 1 -a <columbia_ip>

    Assuming that this command does not fail, you will see a bunch of output that we need to interpret. This output is truncated, but I wanted to give you an idea of what to expect in the output.

    ib_send_bw -d mlx5_0 -i 1 -a 172.16.50.12
    ---------------------------------------------------------------------------------------
    Send BW Test
    Dual-port : OFF Device : mlx5_0
    Number of qps : 1 Transport type : IB
    Connection type : RC Using SRQ : OFF
    PCIe relax order: ON Lock-free : OFF
    WARNING: CPU is not PCIe relaxed ordering compliant.
    WARNING: You should disable PCIe RO with `--disable_pcie_relaxed` for both server and client.
    ibv_wr* API : ON Using DDP : OFF
    TX depth : 128
    CQ Moderation : 100
    CQE Poll Batch : 16
    Mtu : 4096[B]
    Link type : IB
    Max inline data : 0[B]
    rdma_cm QPs : OFF
    Data ex. method : Ethernet
    ---------------------------------------------------------------------------------------
    local address: LID 0x02 QPN 0x0107 PSN 0xed831e
    remote address: LID 0x01 QPN 0x0107 PSN 0xa2c511
    ---------------------------------------------------------------------------------------
    #bytes #iterations BW peak[MiB/sec] BW average[MiB/sec] MsgRate[Mpps]
    Conflicting CPU frequency values detected: 1200.000000 != 1300.046000. CPU Frequency is not max.
    2 1000 7.79 7.40 3.879797

    Keep in mind that our IB bottleneck is our 40Gbe IB Switch. Here is what we can interpret from our test data.

    • Plateau was about: 3776.9 MiB/s which is about 31.7 Gbit/s
    • That is a normal practical result for a nominal 40 Gb InfiniBand-class link
    • Our plateau is consistent and stable, which is good

    Our InfiniBand link is healthy enough to sustain near-expected throughput, there are no obvious severe bottleneck or broken configuration. We are seeing some GPU frequency warnings, and some “PCIe relaxed ordering” warnings so lets fix those any try the test again.

    What is PCIe Relaxed Ordering? PCIe Relaxed Ordering is a performance feature where The CPU/NIC is allowed to reorder memory transactions. This can improve throughput by reducing stalls and increasing parallelism

    On both hosts, run the command below.

    cpupower frequency-set -g performance


    Now back on the first host, kick off the listen side of the test.

    ib_send_bw -d mlx5_0 -i 1 -a -q 4 --disable_pcie_relaxed

    And on the other server we kick off the test itself.

    ib_send_bw -d mlx5_0 -i 1 -a -q 4 --disable_pcie_relaxed <columbia_ip>

    Why these flags

    FlagPurpose
    -d mlx5_0Select your ConnectX-4 device
    -i 1Use IB port 1
    -aSweep all message sizes
    -q 4Use multiple queue pairs (better utilization)
    --disable_pcie_relaxedMatch your CPU capabilities and remove warning

    So lets summarize our output.

    • Almost identical throughput as initial test
    • Slight improvement in consistency
    • Cleaner test conditions (set cpu-frequency to performance)
    • Multiple QPs established (we see 4 QPNs)
    • We still see CPU Frequency is not max, however this is non issue as we have already saturated our links.


    Wrap Up

    In our previous post, we stood up our IB network, and performed some basic fabric tests. Today was all about performance testing and testing with the actual RDMA verb stack. We found that our fabric was pretty much performing as expected out of the box with minimal tuning, as we are hitting near-theoretical limits for our 40Gb hardware.

    We have a stable, low latency, high bandwidth IB Fabric.

    I was hoping to get to GPU direct testing today, however that looks like it might a bit of a beast and I think I will call it a day and do a bit more research on the topic.